Beginning Portal 8 IBM had started implementing open id concept to integrate with Google, Yahoo, Facebook seamlessly. Trust association interceptor(TAI) will be the mediator for identity provider and web sphere portal server. Now IBM has created a new extension point for this and brought open id concept.
Step 1 :- We need to enable enable-identityprovider-tai this particular service and run config task given below under wp_profile_root
ConfigEngine.bat enable-identityprovider-tai -DWasUserId=wpsadmin -DWasPassword=passw0rd_123 -Didp.providerlist=openid -Dopenid.servicenames = Google -Dopenid.servicenames.endpoints = https://www.google.com/accounts/o8/id -Dprovider.openid.nonce_valid_time = 300

show_idp_option
Set this required parameter to true to show the identity provider authentication feature on the portlet.
show_idp_max 1
show_idp_freeform_field true
Google.image http://findicons.com/files/icons/816/icons_web_2_0/128/google.png
Google.required
Google.protocol openid.ax
providername represents the case-sensitive name of the identity provider. Set this required parameter to define the Identity Provider Attribute Exchange protocol. Simple Registration (SREG) and Attribute Exchange (AX) are supported. The supported values for the parameters are openid.sreg for SREG or openid.ax for AX. You must create a parameter for each supported identity provider service name; for example: Google.protocol, aol.protocol, and myOpenID.protocol.


Step 1 :- We need to enable enable-identityprovider-tai this particular service and run config task given below under wp_profile_root
ConfigEngine.bat enable-identityprovider-tai -DWasUserId=wpsadmin -DWasPassword=passw0rd_123 -Didp.providerlist=openid -Dopenid.servicenames = Google -Dopenid.servicenames.endpoints = https://www.google.com/accounts/o8/id -Dprovider.openid.nonce_valid_time = 300
Step 2 :- Now we need to configure Login portlet to support authentication with gmail
- Configure the Login portlet with the following parameters as key and value:Tip: During authentication, WebSphere Portal server retrieves attributes from the Identity Provider. Custom parameters, such as languages preferences, are not automatically retrieved. You must add these parameters to Portal. If the parameter does not exist, enter the parameter name in New Preference and the parameter value in New value. Then click Add to add the new parameter to the Login portlet.
- show_idp_option true
- show_idp_max 1
- Set this required parameter to the maximum number of identity providers that are shown on the portlet. You define the list of providers when you run the enable-identityprovider-tai task. If you defined five identity providers and want two to show on the portlet, set this parameter to 2. On the portlet, two identity providers are shown. Click More to show the complete list of identity providers.
- show_idp_freeform_field true
- Set this required parameter to true to use the full OpenID string and not restrict it to certain known services. This option shows a free-form field on the portlet. If set, users can enter any OpenID identifier.
- Google.image http://findicons.com/files/icons/816/icons_web_2_0/128/google.png
- providername represents the case-sensitive name of the identity provider. For example, you would create the Google.image parameter. Set this optional parameter to define an image for the configured identity provider buttons. You can define whether a text button or an image is shown. Enter the URL of the identity provider image.
 Create pref values as give below
ibm-primaryEmail|http://axschema.org/contact/email;
preferredLanguage|http://axschema.org/pref/language;
givenName|http://axschema.org/namePerson/first;
sn|http://axschema.org/namePerson/last
preferredLanguage|http://axschema.org/pref/language;
givenName|http://axschema.org/namePerson/first;
sn|http://axschema.org/namePerson/last
Google.optional
ibm-primaryEmail|http://axschema.org/contact/email;
preferredLanguage|http://axschema.org/pref/language;
givenName|http://axschema.org/namePerson/first;
sn|http://axschema.org/namePerson/last
preferredLanguage|http://axschema.org/pref/language;
givenName|http://axschema.org/namePerson/first;
sn|http://axschema.org/namePerson/last
Step 4 :-
- PortalServer_root\prereqs.infra\prereq.commons.httpclient\lib\ext\commons-codec-1.3.jar
- PortalServer_root\prereqs.infra\prereq.commons.httpclient\lib\ext\commons-httpclient-3.0.1.jar
Step 5 :-
Step 6 :- Now restart the portal server
- Enter the following information and then click Retrieve signer information:
- Host
- www.google.com for Google
- Port
- 443.
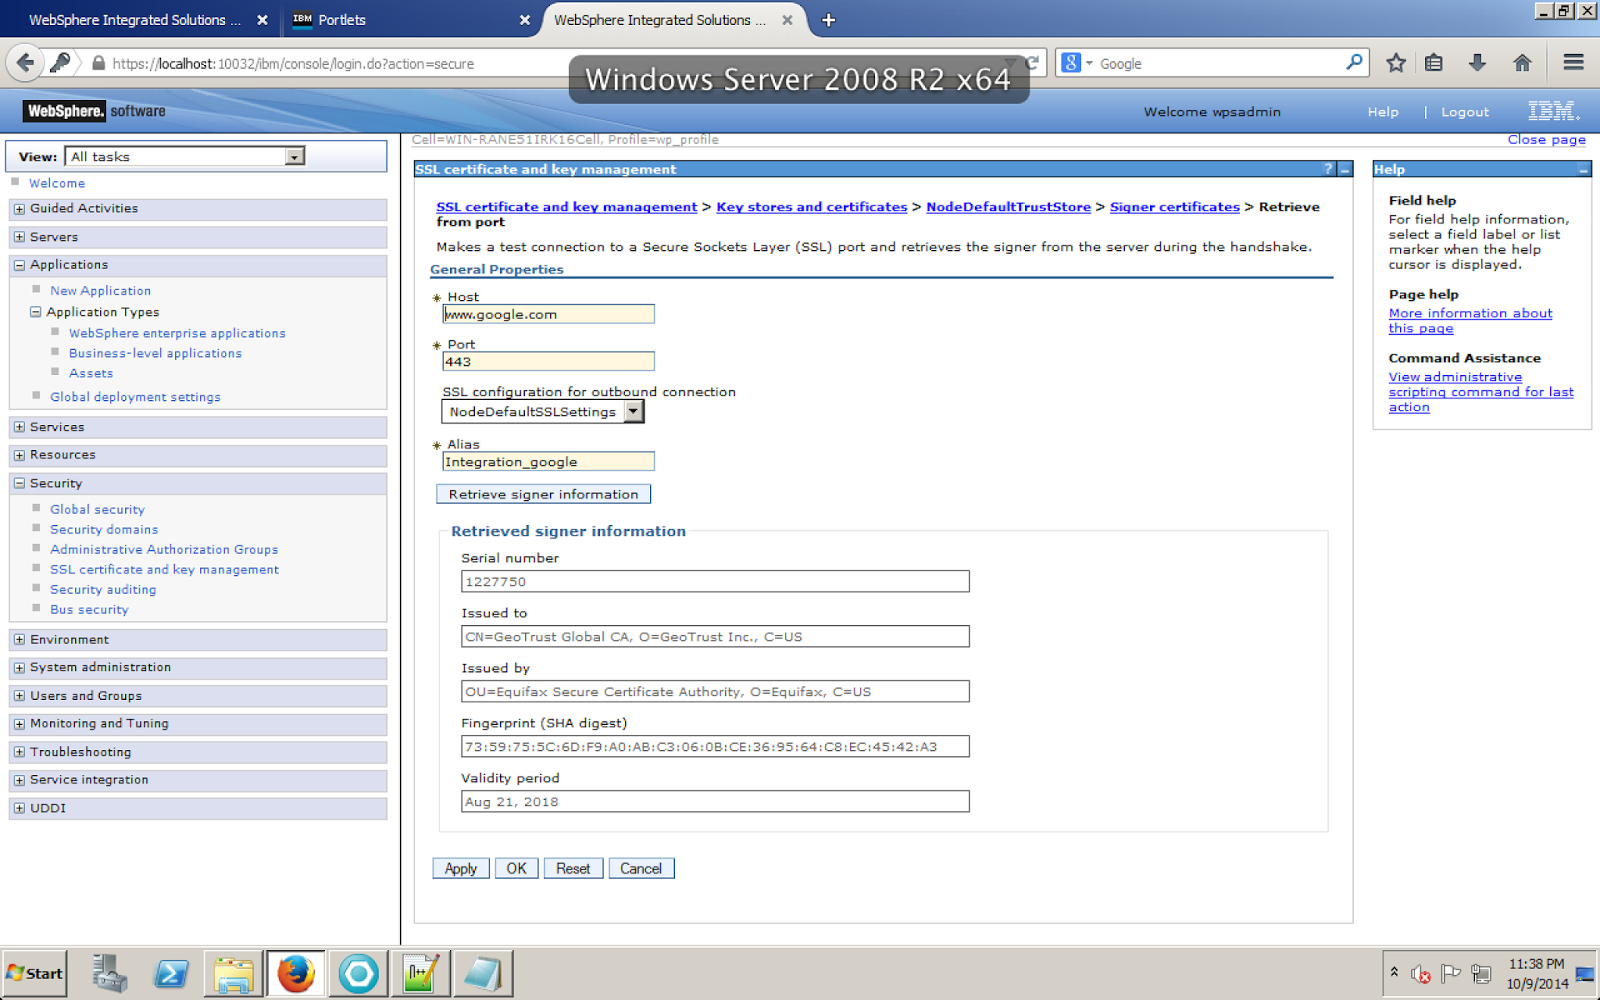 Alias
Alias- Integration_google
Step 6 :- Now restart the portal server
Step 7 :- Now navigate to portal login page you will be able to see google link. We can login by clicking that image or by entering open id and then click on login. Then in new tab login to gmail so that it won't prompt for userid/pwd or you can enter it when it prompts.
Step 8 :- After clicking on google image you will be getting below error because user belonging to that gmail doesn't have a account created in our local portal. So it will ask you to associate it to any existing account in portal or you can turn on transient users setting to enable to third party user login without account in portal.
Step 9 :- Now we have to configure transient users in portal
1) Before enabling the transient user feature, you must verify that your security configuration is a federated user registry. If you configured the stand-alone user registry, you must change to the federated user registry. To locate the proper instructions, navigate to and then select the Managing your user registry option for your operating system. Then select Changing from a stand-alone repository to a federated respository.
Google users can authenticate with the WebSphere Portal server instance using their identity provider credentials. They are granted access to certain data within WebSphere Portal without having a local account. You can grant the same access to all identity providers or you can configure different access rights depending on the identity provider. With this option you, can provide a personalized view to unregistered users while still providing benefits to fully registered users.
2)Run below config engine task {wp_profile_root} and operations to enable transient users
ConfigEngine.bat enable-transient-user -DWasUserId=wpsadmin -DWasPassword=passw0rd_123 -Dtransparent.suffix=o=transparent -Dtransparent.prefix=cn
- Name: buildgroupsfor
- Value: Enter the list of supported Identity Providers you want to build groups for; for example: facebook myOpenID Google. The items in the list must be separated by a space. The Identity Providers are case-sensitive and should match what you entered for the idp.providerlist and openid.servicenames parameters
- Complete the following steps to load user attributes during authentication:Note: Transient users do not have attributes stored locally. Therefore, it is helpful to load attributes from the Identity Provider during authentication.Note: If you want to allow transient users to create or modify pages you must map a short name to the users. The attribute used for the short name is the User default search attribute. If you do not know the attribute name, you can find it defined in the PumaStoreService Resource Environment provider. The most common values are uid and cn.

- Add the following new properties for OpenID:
- provider.openid.loadattributes=provider|method;provider2|methodNote: method can either be openid.sreg or openid.ax depending on the type of OpenID your Identity Provider supports.
For example, you might add the following new properties for OpenID:- provider.openid.loadattributes=google|openid.ax;yahoo|openid.ax
- The following properties must be entered as one line.
- provider.openid.loadattributes.google=cn|
- http://axschema.org/namePerson/first;sn|
- http://axschema.org/namePerson/last;ibm-primaryEmail|
- http://axschema.org/contact/email

- provider.openid.loadattributes=provider|method;provider2|method


Step 10 :- Now try to login to portal by clicking on google image


No comments:
Post a Comment