Sunday, 7 December 2014

Blogs and Wiki's in WCM8.0 websphere portal

Blogs :- It s a place where you post a solution and ask ideas of others related to that solution. Either you can start a new topic and ask views of others.

Wikis :- Is the place where you can put all information related to a topic and let all authors to have inline editing. By this we can have one wiki as single point of contact for any domain or topic.

1) Blogs :- WCM provides default library for blogs like Web Resource template v7.0, Blog solo v7.0 and Blog v7.0 library.


Adding a blog or blog library to a page

With Editor access to the portal or the portal page, you can add a blog or blog library to a page. Choose a blog to collaborate with your team on a single topic. Choose a blog library to collaborate with your team on multiple topics in a centralized view.

Step 1 :-

  1. Create a page for the blog or blog library or open an existing page(Make sure it has full/defered dojo profile).
  2. Click the Content tab, then click Communications.
  3. Click Blog Library to add a team blog or click Blog to create a single-topic blog.
  4. Click Add to page.
  5. Provide a name. Then click Add.
  6. This action copies the appropriate IBM® Web Content Manager blog template library and places an instance of the web content viewer on the page.

A library with same name is created


 Step 2 :Create Post to add content. You can click Edit to modify content, delete a post by clicking Delete.


Now try to login with a different user apart from wpadmin and post a comment for previous post.


Now click on Add a comment and then put some comments


Conclusion :- Like this you can create multiple posts inside a blog. There is another option of adding blog library to a page. where we can view list of blog posts .


2) Wikis :-  In wiki's we store multiple content as one repository it contains two libraries . As blogs it has two libraries web resource v7.0 library and wiki library v7.0 library.

Step1 :- Similarly like Blogs add wiki's also to a portal page as given below.


Step2 :- You can click new page and create new pages. Below view is for administrator role he can delete and create new pages. 


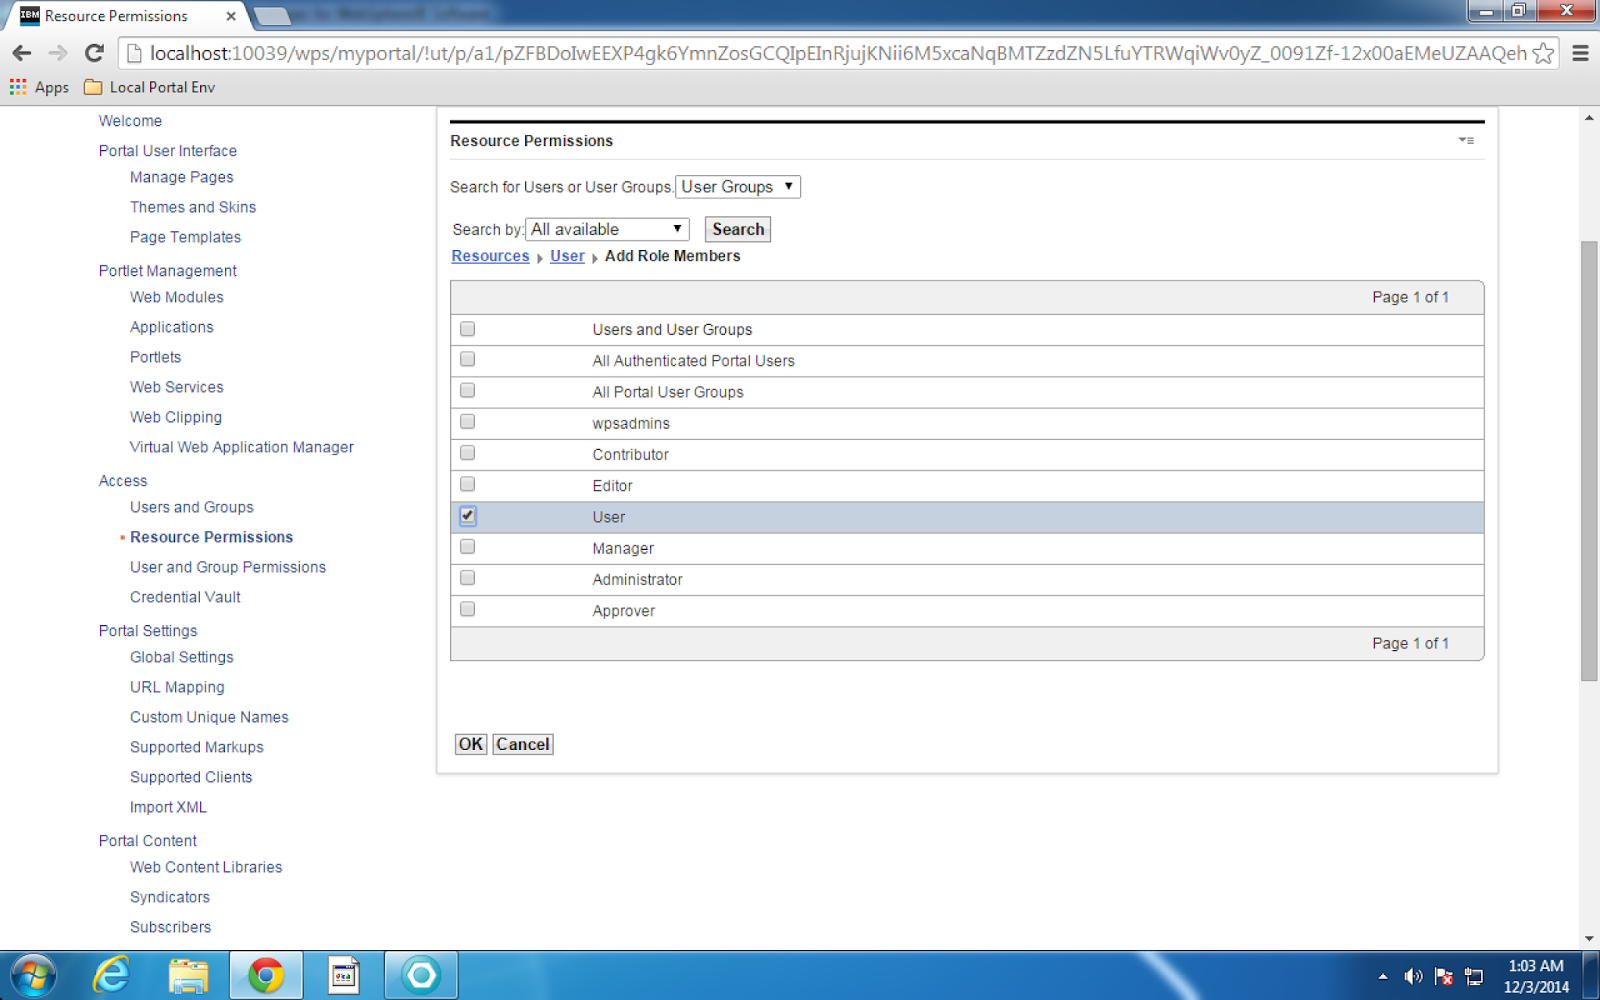
Step3 :- For editors we should not provide access to delete . So we need to assign a user group to editor role. 

 Navigate to the library which is created and edit access permissions.


Now edit the role for editor and add Editor group to it.


Click edit and then click on ok button.


Step 4 :- Now login as editor and view the wiki page. You will not have a option to delete a wiki.


Conclusion :- Blogs and wiki's are social portlets readily available for use.

Thursday, 4 December 2014

Syndication in WCM8.0 websphere portal

Syndication :-  Syndication is nothing but replication the web content from one library to another library. For this we need to set a subscriber and a syndicator. Syndicator will be sending data to subscriber and subscriber will be receiving content from syndicator.


Live items:
Live item syndication is mostly used when syndicating to a staging or delivery server. The following items are syndicated:
  • Published
  • Expired
Draft items, projects and items in a project are not syndicated.
Live and projects:
The advantage of using "Live and projects" syndication is to gradually syndicate projects to a staging or delivery server rather that waiting to syndicate all the items in a project after they all achieve a published state. The following items are syndicated:
  • Published
  • Expired
  • Projects
  • Draft items in a project
Draft items outside of projects are not syndicated.
All items:
All item syndication is mostly used when syndicating between servers within an authoring environment. The following items are syndicated:
  • Published
  • Expired
  • Projects
  • Draft items in a project
  • Other draft items
  • Versions
  • Deleted items              

Steps to create syndicators :-
  • To syndicate a library that contains more than 10000 items, update the maximum Java heap size used by the portal application server on the subscriber server:
    1. In the WebSphere® Integrated Solutions Console, navigate to the Java virtual machine settings.
      Stand-alone server:
      Servers > Server Types > WebSphere application servers > WebSphere_Portal > Java and Process Management > Process definition > Java Virtual Machine
      Clustered server:
      System administration > Deployment manager > Java and Process Management > Process Definition > Java Virtual Machine
    2. Update the value in the Maximum Heap Size field. A value of at least 1024 MB is recommended.
    3. Click OK, and then save your changes.

Procedure

To set up a syndication relationship, complete the following steps:

  1. Ensure both the subscriber and syndicator are running and that they can access each other over a network.
  2. On your subscriber server, log in to IBM WebSphere Portal.
  3. Go to Administration > Access > Credential Vault and create a shared credential vault slot to allow you to access the syndicator
  4. Go to Administration > Portal Content > Subscribers.
  5. Click Subscribe Now.
  6. Enter the syndicator URL in the form of http://HostName:HostPort/WcmContextRoot. For example: http://authoring:10039/wps/wcm
    Note:
    When syndicating from a virtual portal:
    Using the URL context of a virtual portal:
    http://HostName:HostPort/wps/wcm/url_context
    Using the hostname of a virtual portal:
    http://VirtualHostName:HostPort/wps/wcm
  7. Enter a name for the syndicator item. This name is used for the syndicator item that is created on the syndicator server. Enter a name that helps identify the syndication relationship you are creating. This name must be unique and cannot be the same as an existing syndicator name.
    Note: To reuse syndicator names of previously deleted syndication relationships on a subscriber, you must also delete the same relationship on the syndicator.
  8. Enter a name for the subscriber item. This name is used for the subscriber item that is created on the subscriber server. Enter a name that helps identify the syndication relationship you are creating. This name must be unique and cannot be the same as an existing subscriber name.
  9. Select the credential vault slot you created previously.
  10. Click Next
  11. Select the libraries you want to subscribe to.
  12. To begin syndication, click either Update Subscriber or Rebuild Subscriber button.

Explaining Authoring tool and its uses in IBM WCM8.0

Authoring tool :-  Authoring tool provides you authoring functions like editing contents in web content viewer portlet.

Step1 :- Create a AT by adding component reference in manage elements.


Create a site area to hold the content


Step2 :- Create a Authoring Tool as given below.


Fill the details then select the Authoring Template, Sitearea


Everywhere put a place holder tag for href and name


In header design put a div structure and separate remaining by span and br tags


Step 3 :- Now create the content with previously created AT and then map above Authoring Tool component to it.


Step 4 :- Now create a PT and include the AT as element tags in it


Step 5 :- Now map the AT and PT in site area 


Step 6 :- Now create page add web content viewer portlet and map site-area to it.


                          Click on new it will take you to new content. 


Click on read then you can read the content


Note :- You can even make the tab to open as a separate browser tag. To do that you need to change the tag to  ( <a href=" [Placeholder tag="href" format="url"]" target="_blank">
 [Placeholder tag="name"]</a> )

Wednesday, 3 December 2014

Explaining Security at Library level and Item level in WCM Part 2

Pre- requisite :- Please refer to my previous blog

Overview :- In this blog we will see security at item level, How to hide At,Pt or unnecessary views to users or approvers or contributors or editors.

Step 1 :- Navigate to portal administration then to web content library then click on library resources security instead of library security.


Now click on any access permission to which you don't want to show to some users


Step 2 :- I clicked on access button beside Authoring Template. Then uncheck Contributor check box. So that access privileges wont propagate till item level like Authoring Template.


              Click on Apply then done.

Step 3 :- Now sign in as contributor access and check you want be able to see authoring templates view.


This user is not able to view AT


Note :- Like this you can control the access. The other way of controlling is give content creators,designers,approvers as contributor role at library level and give these three roles as editor roles at library item levels like AT,PT. In this way we get access to library and then to AT or PT item level. Depending upon convenience you can follow any approach.

Explaining Security at Library level and Item level in WCM Part 1

Security :- The word security means how to control the authenticated user from accessing unauthorized content. WCM  has come up with different types of security roles for library level and item level as given below. Now we will create one user each for this role and access WCM to identify what that particular person can access it and finally summarize roles and responsibilities.

 Library security has five levels:
    User(WcmUser/WcmUser)
    Contributor(WcmContributor/WcmContributor)
    Editor(WcmEditor/WcmEditor)
    Manager(WcmManager/WcmManager)
    Administrator(WcmAdmin/WcmAdmin)(This role has al access this will not be delt in this blog).

Item security has four security levels:
    User(WcmUser/WcmUser)
    Contributor(WcmContributor/WcmContributor)
    Editor(WcmEditor/WcmEditor)
    Approver(WcmApprover/WcmApprover)


As mentioned above we will create users and groups as mentioned in above braces

Step 1 :- Navigate to Portal administration then create all possible combination of groups with members in it as given above

                     
                                                            Similarly do it for all groups


Step 2 :- Now login as a administrator and create new library


Now set access permissions for it


Now click on Edit User Role


Then select which group you want to assign user role and map it


Now click later apply and done


Step 3 :-  Follow the step 2 for all other roles. Now navigate to Application->Web Content Management-> Preferences


Step 4 :- Now click on Edit Shared Settings and select the library and add to WCM as given below


After adding library click ok


Navigate back to Applications->WCM to view it


Step 5 :- Now we will login using each user and experience the view of newly created library. Using this we can identify virtually what role has which type of access to library. So far we have done all our operations as administrator. Now we will try with other users.

User view (WcmUser)


We are were not even able to view the library . That means user role people cannot see the library


Roles
Rendering and authoring portlet access rights
User
Users and groups assigned to this role can:
 View items in a website or rendering portlet that they have been assigned at least user access to.
Note: The simplest way to assign users to this role is to select any of the default user groups such as "All Authenticated Portal Users" or "Anonymous Portal User". Users will still require "user" access to an item before it will be rendered in a website or rendering portlet.

Contributor Role(WcmContributor)


As a Contributor i am able to see the library


As a contributor i have only read access to most of the items


Contributor
Users and groups assigned to this role can:
  • 1) Have all user's access right (as described above).
  • 2)  View libraries the they have been assigned contributor access to in
    an authoring portlet.
  • 3)  Access the "My Items" and "All Items" views in an authoring portlet
    for libraries that they have been assigned contributor access to.
  • 4) Access the item type view within the authoring portlet for item
    types that they been assigned at least user access to.

Editor Role (WcmEditor)


           With Editor role i am able to read, edit, preview but not able to delete any item


Editor
Users and groups assigned to this role can:
  • 1)  Have all contributor's access rights (as described above).
  • 2) For library item types that user and groups have been assigned at
    least editor access to, editors can also access the following actions in the authoring portlet:
    - Create a new item.
    - Add or remove links.

    - Apply authoring template.
    - Copy, edit, delete link to, and move item type. - Restore a version.
    - Edit version labels 


  • Manager Role (WcmManager

Using WCM manager role i am able to delete, unlock, purge, set access to items


Manager
Users and groups assigned to these roles can:
  • 1)  Have all editor's access rights (as described above).
  • 2)  For library item types that they have been assigned manager
    access to, managers can also perform the following actions in the authoring portlet:
    - Edit access settings.
    - Edit next stage.

    - Purge.
    - Unlock.
    - Edit user profile.


Note :- As we know administrator will be having final authorities.


Monday, 1 December 2014

Understanding elements,tags in IBM WCM 8.0

Elements :- We can say elements are the key parts in WCM. There are different types of elements which can be included in Authoring Template, SiteArea, SiteAreaTemplate.

List of available elements :- 
ComponentReference
Date and Time
FileResource
HTML
Image
JSP
Link
Number
Options resource
RichText
ShortText
Text
User selection

Tag :-  After elements important things are tags. These tags are used in Components, Presentation templates to accomplish our logic or to include components in PT or get some information like context or to perform logics.

List of available Tags :- 
Component
Editable Element
Editable Property
Element
If Edit Mode
If Not Edit Mode
Path Component
Plugin Component
Property
StyleSheet

URL Component

Example exploring Path Component :- We will create a PT,map SiteArea,PT and Content then display all possible values in a table. This would be the best way to explore the tags or elements.

PT


Output


Note :- This post will be updated regularly until examples provided for all tags,elements.

Custom single threaded java server

 package com.diffengine.csv; import java.io.*; import java.net.*; import java.util.Date; public class Server { public static void main(Str...